Create a Test Definition
Last updated: Apr 17, 2026
Who can complete this task?
Veeva LIMS Basics: Design Data Admin, Stability Design & Study Admin, Vault Admin
A test definition is a record that defines how test results are captured and displayed. Test definitions are reusable across materials as long as the underlying test is the same.
Example
You could create a test definition for Appearance. Material A and Material B can use the same definition to test appearance. In the spec data record, you would add a criteria/limit to define what the appearance should be.
Create Test Definition
To create a test definition:
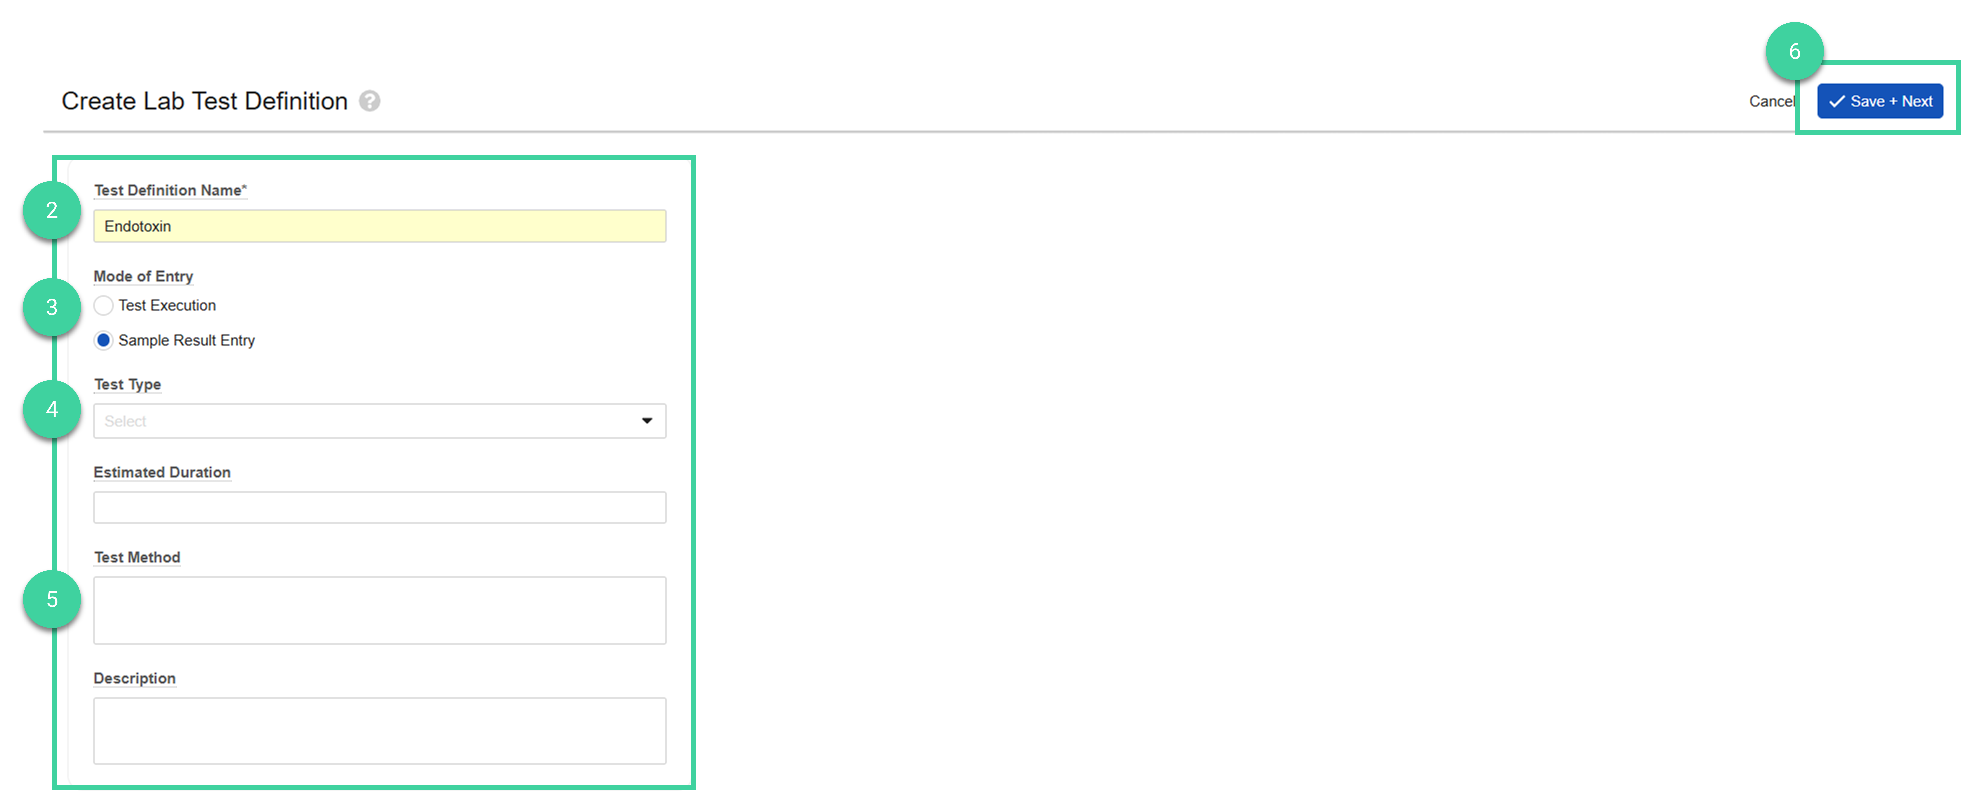
Navigate to Design & Admin > Design Data > Test Definitions and click Create.

Enter the Test Definition Name.
Select Sample Result Entry as the Mode of Entry.
Leave Test Type and Estimated Duration blank.
Optionally, add a Test Method and/or Description.
Click Save + Next.
Note
You can create a test definition by navigating to Design & Admin > Design Data > Test Definitions, hovering your mouse over an existing test definition and selecting Create Design Data Copy. This will also copy the results definitions and you can make adjustments as needed for the new record (e.g., update the Test Definition Name, add/edit/delete Result definitions, etc.).
Create Result Definition
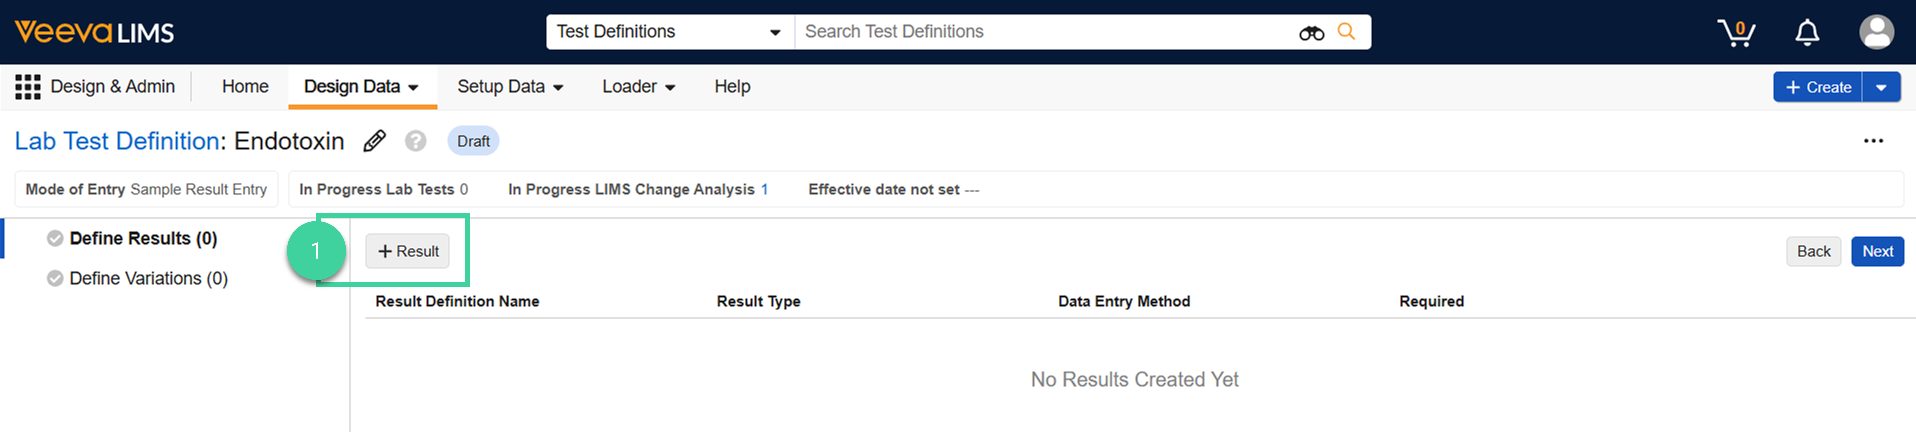
After creating the test definition record, the next step is to create one or more result definitions.
To create a result definition:
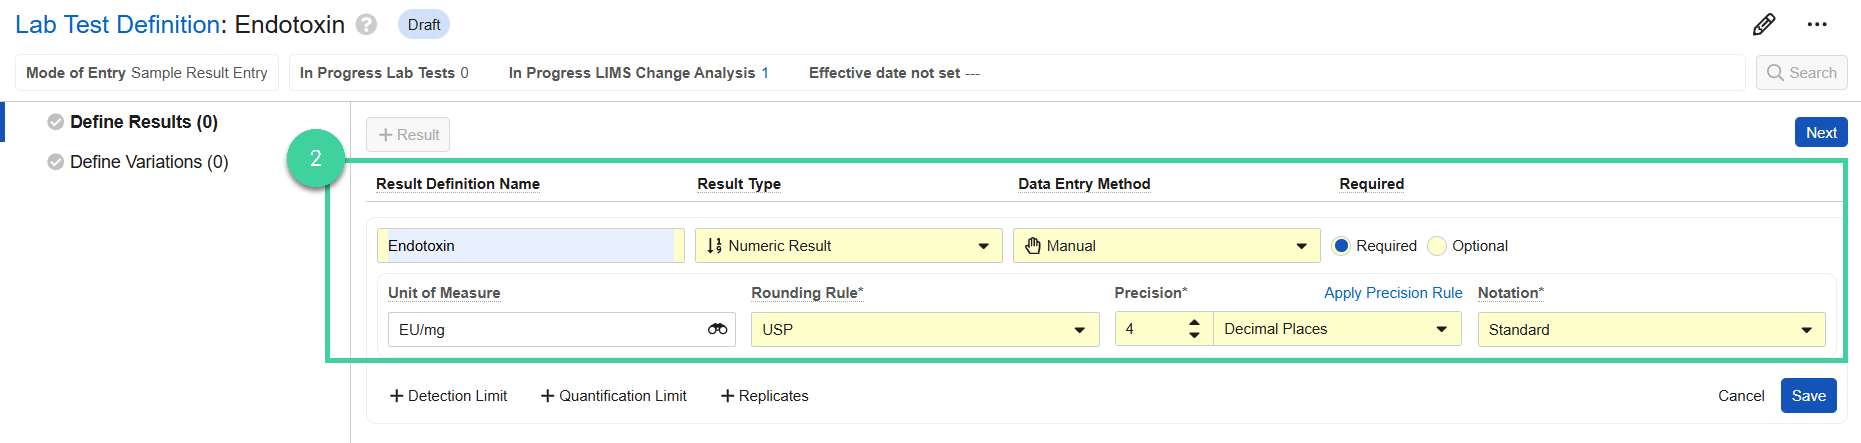
Click + Result.
Select the Result Type (Date, DateTime, Numeric, Picklist, or Text) from the dropdown. The information that you need to provide for the result definition depends on the result type. To create a Date Result, DateTime Result, or Text Result provide the following:
- Result Definition Name Enter the result definition name.
- Data Entry Method Select Manual.
- Required Indicate if the result is required (Yes) or optional (No).
To create a Picklist Result, provide the following:
- Result Definition Name Enter the result definition name.
- Data Entry Method Select Manual.
- Required Indicate if the result is required (Yes) or optional (No).
- Picklist
To create a Numeric Result, provide the following:
- Result Definition Name Enter the result definition name.
- Data Entry Method Select Manual.
- Required Indicate if the result is required (Yes) or optional (No).
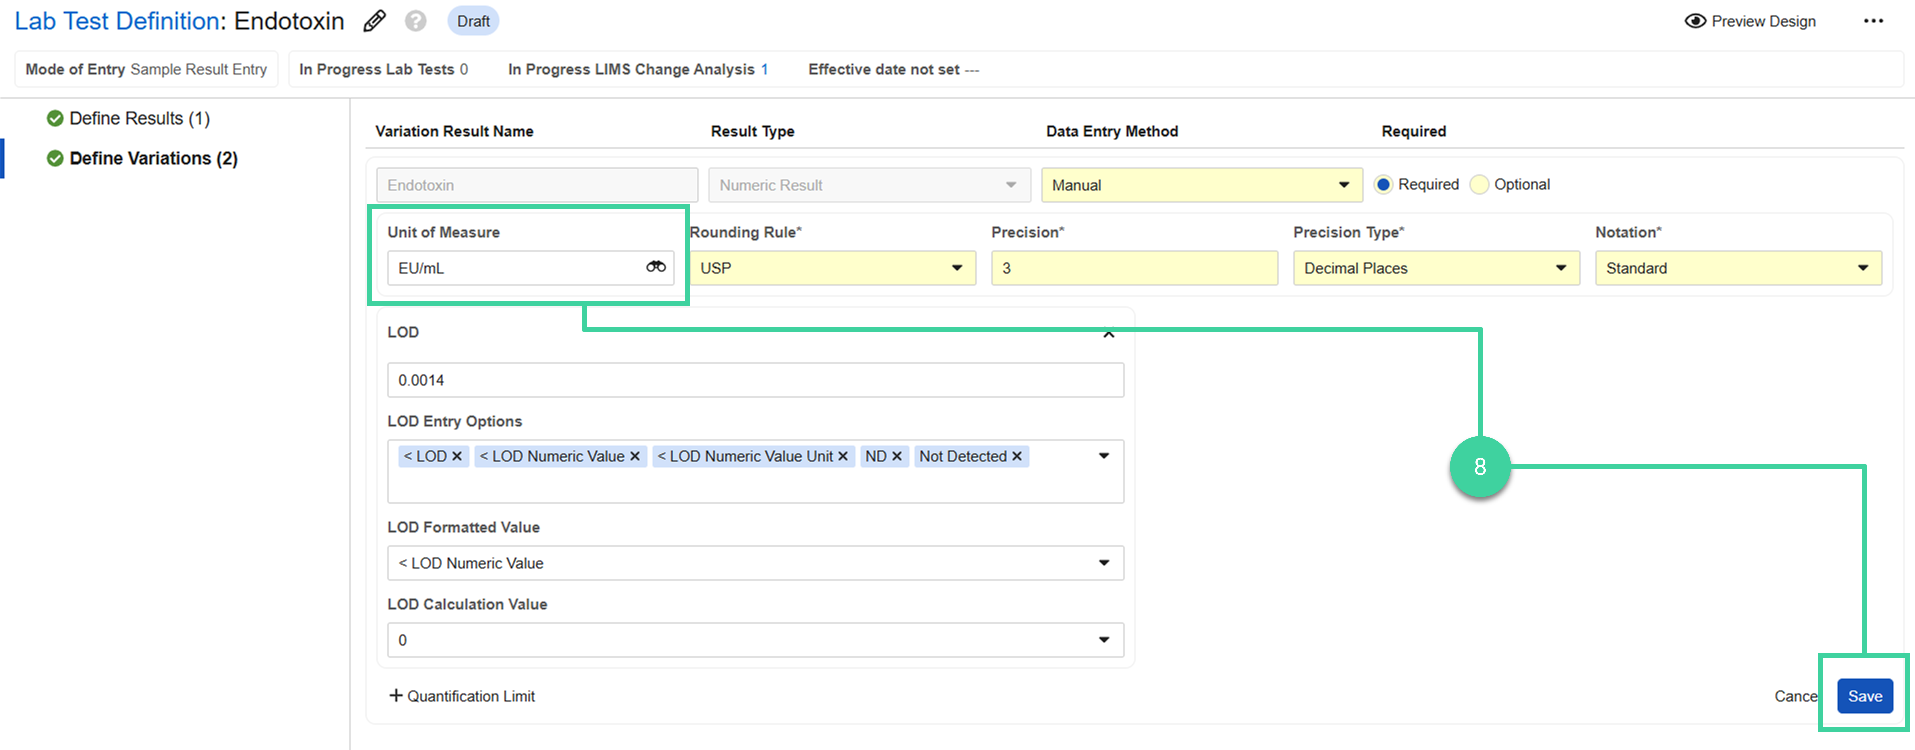
- Unit of Measure Select the unit of measure for this result, if applicable.
- Rounding Rule Select the rounding rule to determine how the result value will be formatted (in conjunction with precision type and precision value).
- Apply Precision Rule/Apply Precision Click to toggle between applying a precision rule or using standard precision. If applying a precision rule, select ICHQ3A/B from the dropdown. This is intended for impurity results. If used, when a result is entered for this test at runtime, it will automatically be formatted. If the value is less than 1.0, the precision will be 2. If the value is more than 1.0, the precision will be 1.
- Precision Enter how many significant figures or decimal places should the formatted result display (in conjunction with the rounding rule).
- Precision Type Select whether the formatted result will be rounded using significant figures or decimal places.
- Notation Select whether the formatted result should display in Standard notation or Scientific E-notation.
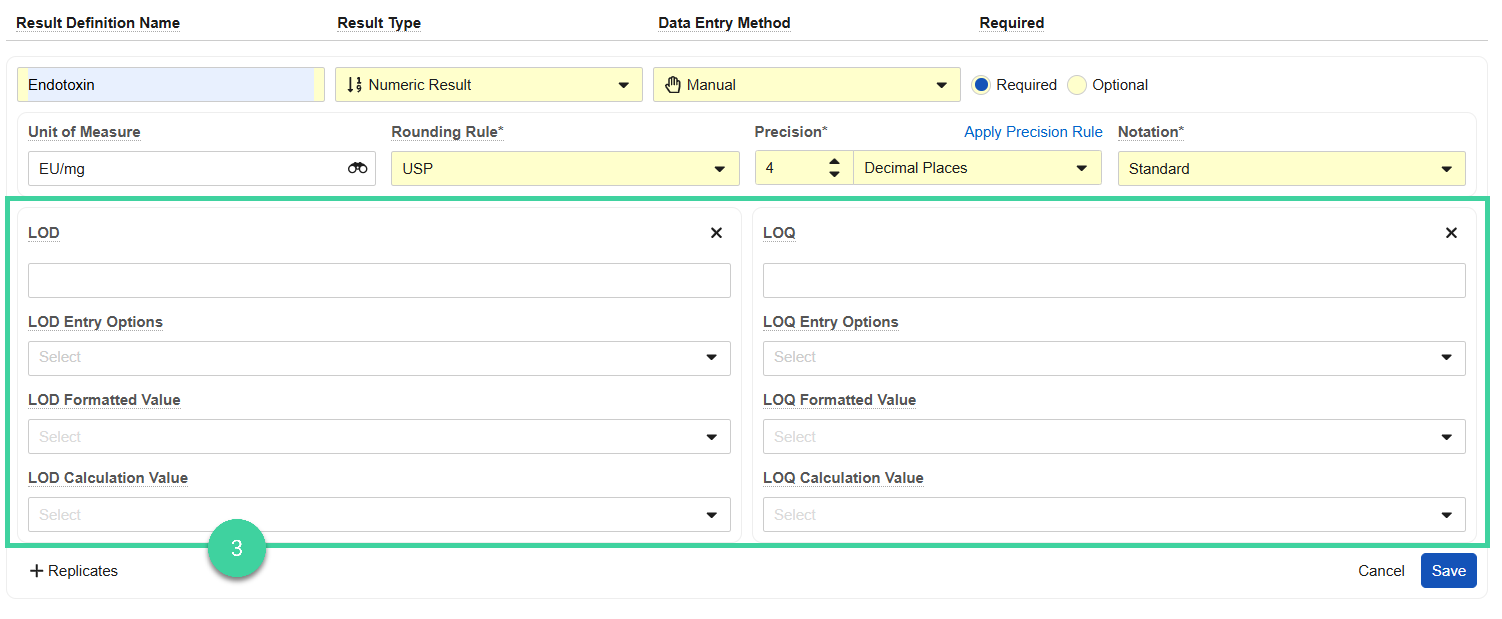
If you’re creating a numeric result, click Detection Limit and provide the Limit of Detection and/or click Quantification Limit and provide the Limit of Quantification details. If a test result comes back lower than the specified limit of detection or quantification, the result will be formatted in a way to indicate it’s below that limit.
- LOD/LOQ Enter the limit of detection or quantification.
- LOD/LOQ Entry Options Select one or more entry options. The results entry user can enter any of the selected text options and the system will format it as selected in the Formated Value field.
- LOD/LOQ Formatted Value Select what you want the system to display if the results entry user enters any of the text options in the previous field or a numeric value below the limit.
- LOD/LOQ Calculation Value Select a value from the list to prepare for future trending functionality. When this feature is implemented in a future release, the selected value will be used when the result is less than the specified limit. Alternatively, this field can be left blank and the system will populate it with zero (0).
If you’re creating a numeric result, click Replicates and specify the Number of Replicates that should be displayed immediately during runtime. If no replicates should be created at runtime by default, but should be added on an ad hoc basis, click the View Additional Settings icon, check Allow Ad Hoc Replicates and enter 0 as the number of replicates.
 Note Replicates allow for the dynamic capture of results at runtime to accommodate unknown impurities because impurity testing can produce variable results depending on the Batch being tested.
Number of Replicates (N) Allow Ad hoc? Resulting Behavior N True Generates N results; user can add more. 0 True Generates 0 results; user can add any. Null True Generates 1 result; user can add more. Null/Greater than 0 False No replicates can be added during testing. Click Save.
Note You can repeat these steps to add additional results definitions if needed. If you do have multiple results definitions, you can drag and drop them to change the order in which they will display during results entry.Click Next.

Click Variation to add a test result definition variation.
Click Preview Design to see how results will be presented for this test definition during results entry. Click Exit Preview to close it.

Click the Lab Test Definition link to exit the result definition page and navigate to the test definition record.

Optionally, populate the Test Method. The Test Method will display for the test on the Certificate of Analysis and is often used to display a method document number. Optionally, populate the Description to provide a description of the test method.
Variations
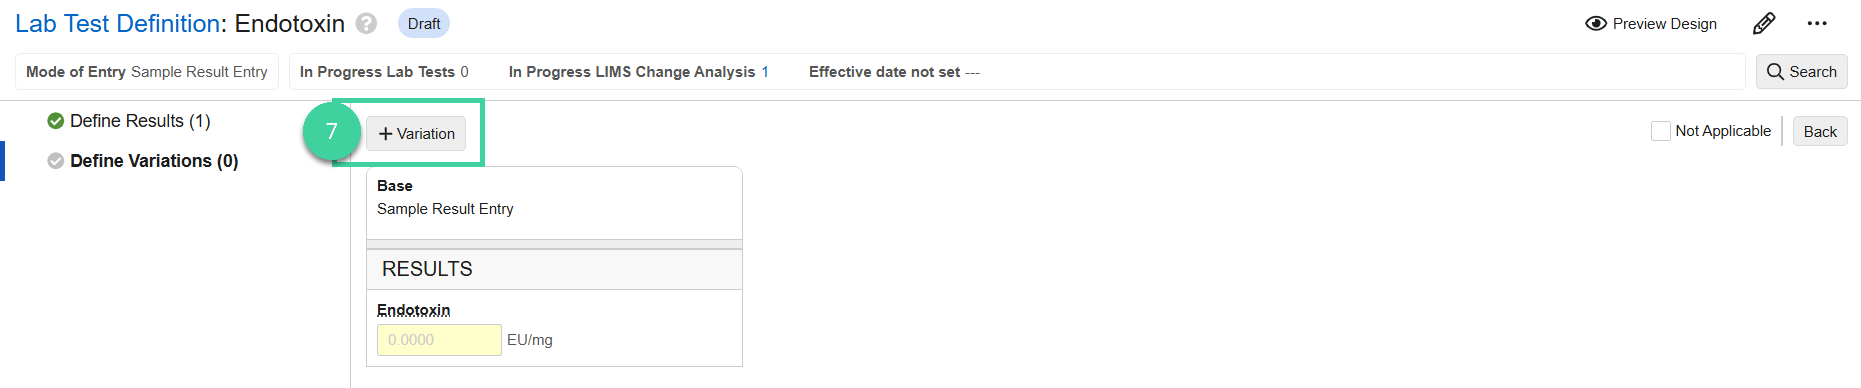
You have the option to define Test Definition Variations to accommodate instances where the fundamental Test Definition is the same, but there are differences in the way test results are performed and reported.
Example 1
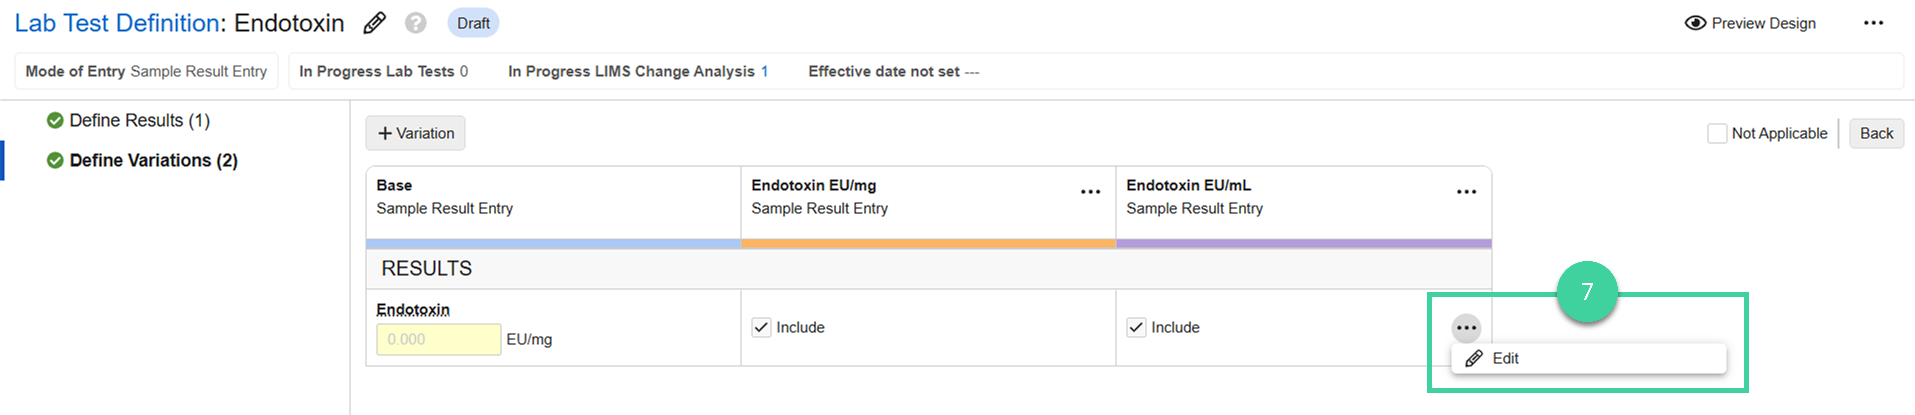
Endotoxin uses different units of measure depending on if it’s run on a liquid (EU/mL) or a solid (EU/mg). In this example, you would create one Results Definition. Then create two Variations. Edit one of the variation results to change the unit of measure.

Example 2
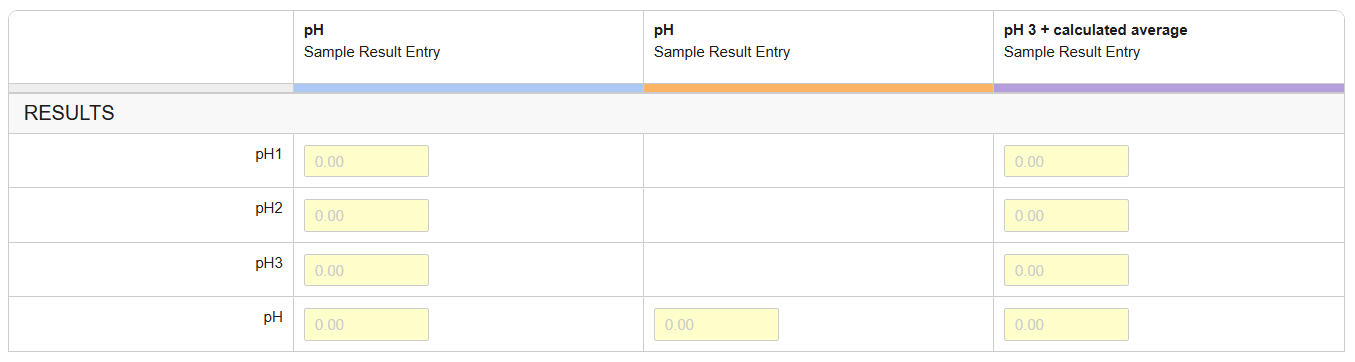
You may receive pH results as an individual value, or three individual results plus a calculated average. In this example, you would create a Results Definition for each. Then create two Variations: one for the single result and another containing the three individual tests plus the calculated average.
To create test definition variations:
Create all necessary Results Definitions.
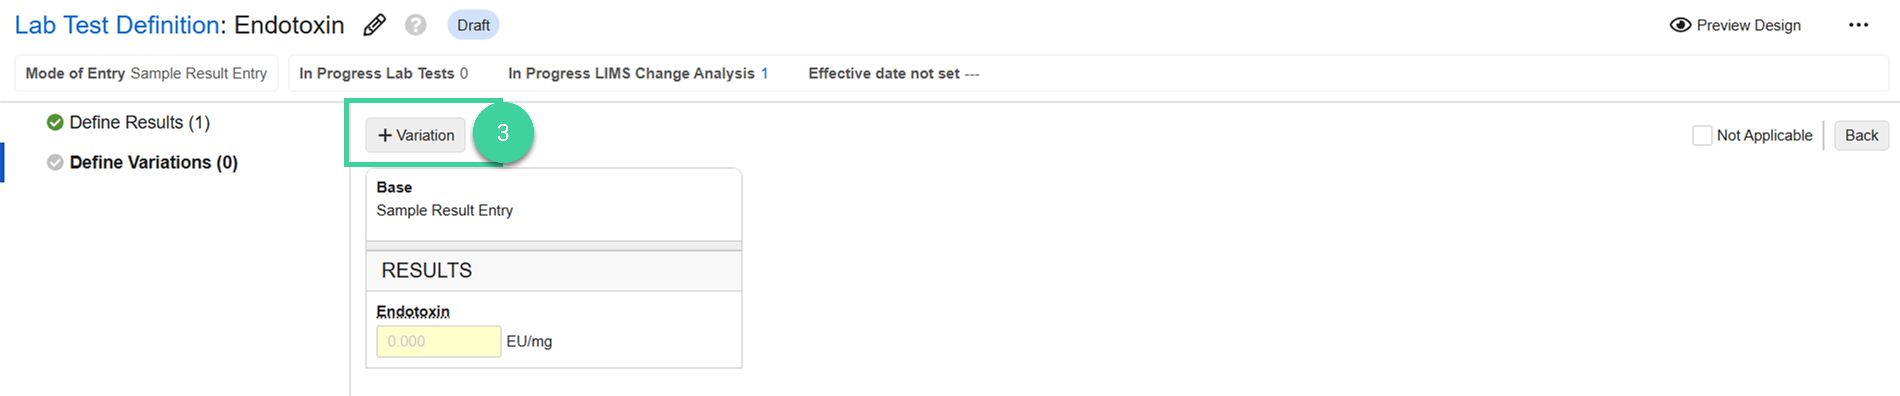
Click Define Variations.

Click + Variation.
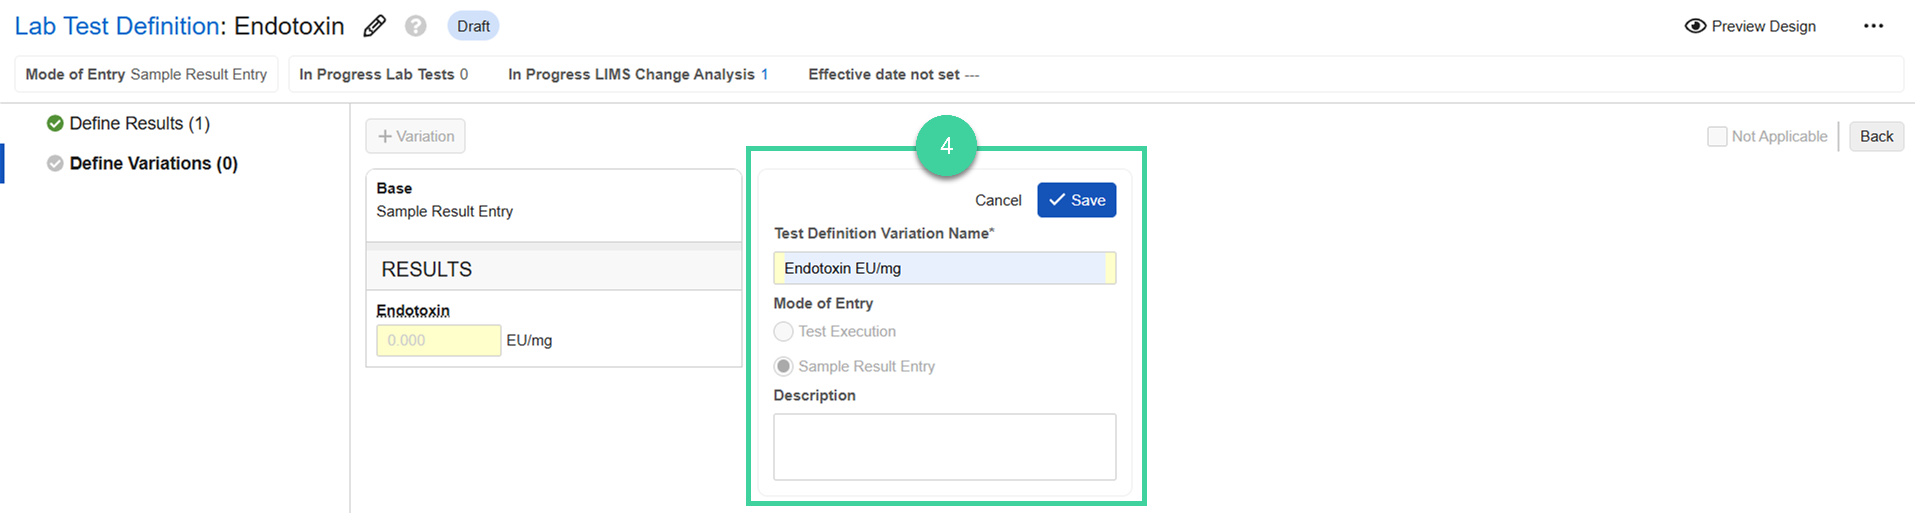
Enter a Test Definition Variation Name, optionally a Description, and click Save.
Click Select Inclusions.
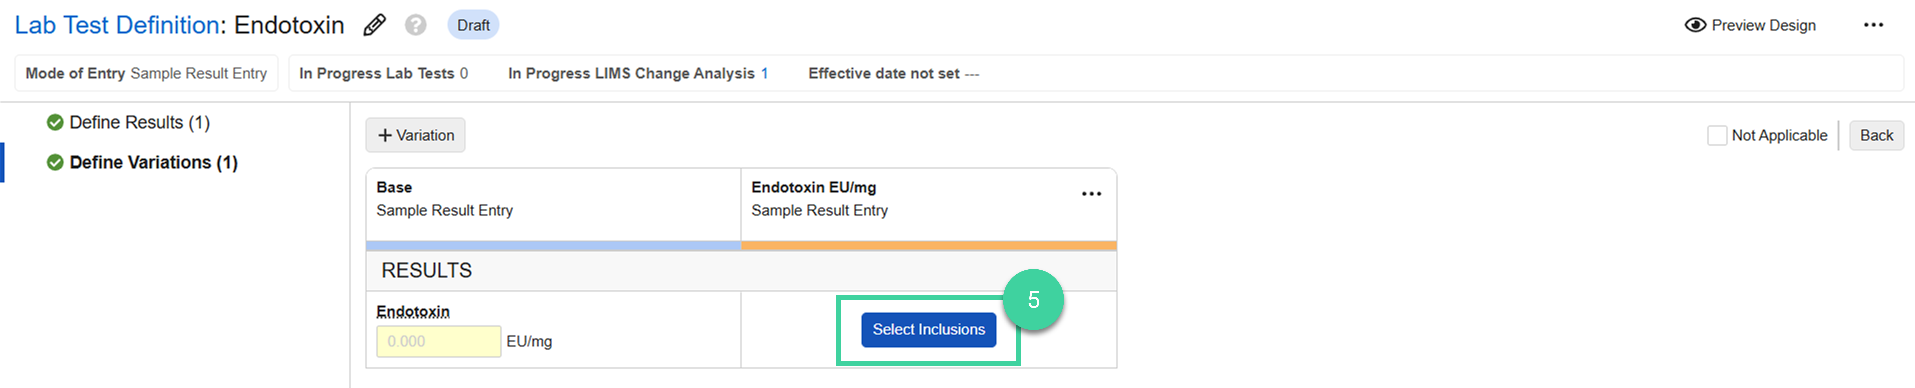
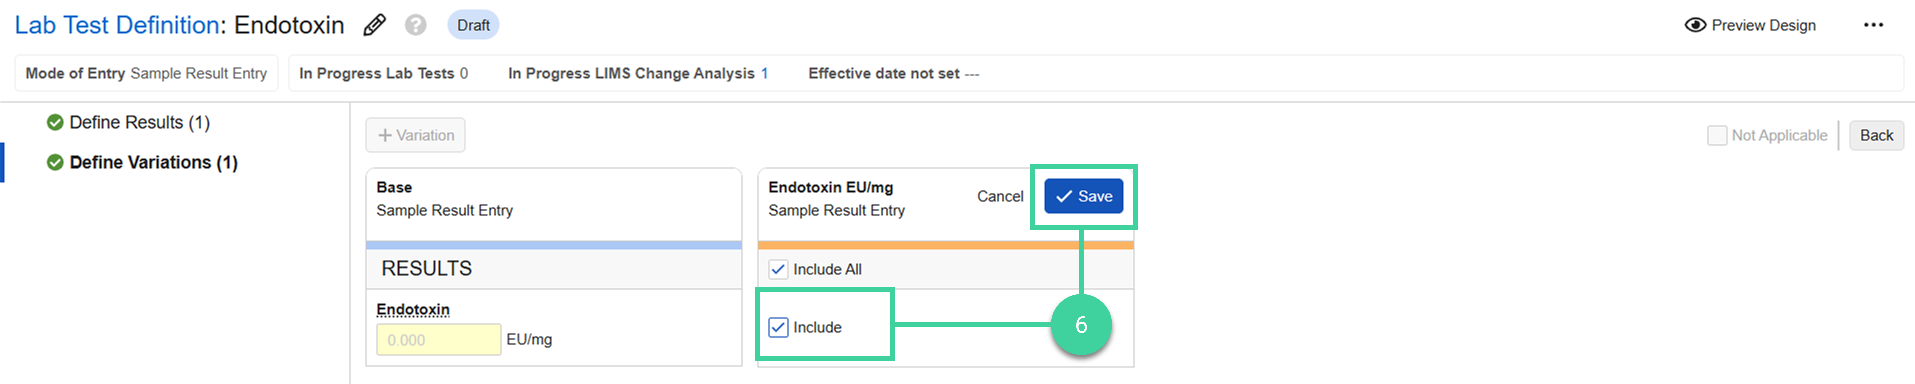
Check the box for each Results Definition you need to include for the variation and click Save.
If you need to edit the result definition for one of the variations (for example, to change the unit of measure), hover your mouse over it and select Edit from the Actions menu.
Make the necessary changes to the result defintion and click Save.
Repeat these steps to define each needed variation.