Complete RIM Migration Activities
Last updated: Apr 24, 2026
These are the steps to performing a migration of Documents & Submissions into Veeva RIM Basics.
Sandbox Migration
Important
Use the Migration Communication Form to notify Veeva of your upcoming migration at least ten (10) business days prior to providing your files for Sandbox migration.
Steps
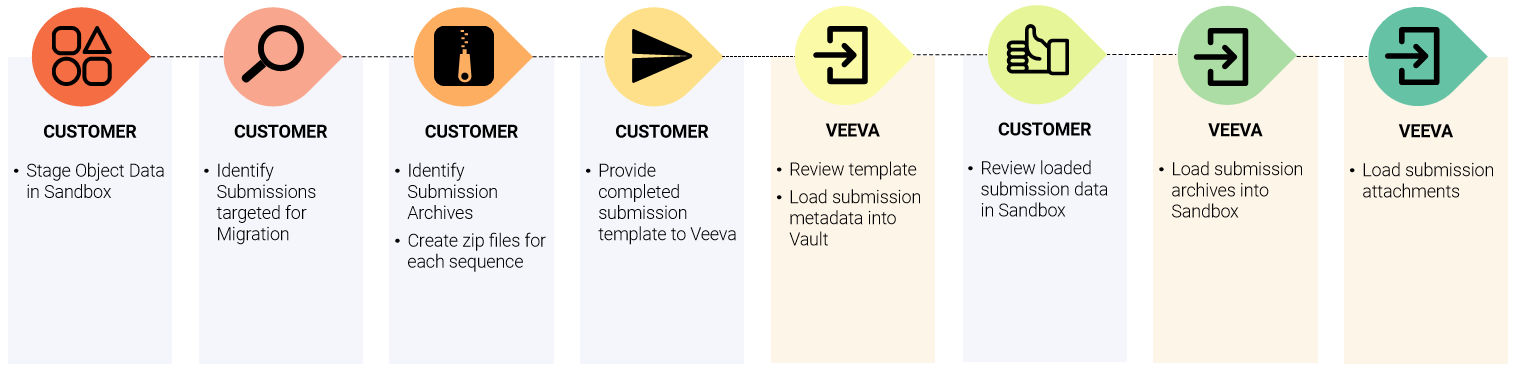
Step 1 (Customer)
Manually create Object Data in Sandbox. The sequence in which objects should/can be staged is as follows:
| Order | Object |
|---|---|
| 1 | Product |
| 2 | Drug Product |
| 3 | Product Pharmaceutical Product |
| 4 | Product Detail |
| 5 | Drug Substance |
| 6 | Excipient |
| 7 | Product Detail Active Substance |
| 8 | Product Detail Inactive Ingredient |
| 9 | Therapeutic Indication |
| 10 | Clinical Study |
| 11 | Clinical Site |
| 12 | Nonclinical Study |
| 13 | Study Site |
| 14 | Manufacturer |
| 15 | Pharmaceutical Product Manufacturer |
| 16 | Active Substance Manufacturer |
| 17 | Inactive Ingredient Manufacturer |
| 18 | Product Active Substance |
| 19 | Product Family Inactive Ingredient |
| 20 | Product Family Indication |
| 21 | Product Clinical Study |
| 22 | Product Nonclinical Study |
| 23 | Application |
| 24 | Product Application |
| 25 | Application Pharmaceutical Product |
| 26 | Application Active Substance |
| 27 | Application Inactive Ingredient |
| 28 | Application Indication |
| 29 | Application Clinical Study |
| 30 | Application Nonclinical Study |
| 31 | Submission* (can be created manually or via provided templates) |
| 32 | Regulatory Objective |
| 33 | Health Authority Question |
| 34 | Commitment |
| 35 | Document* (can be created manually or via provided templates) |
Step 2 (Customer)
Identify Submissions targeted for migration.
Step 3 (Customer)
Identify Submission Archives and create zip files for each sequence.
Populate the Veeva RIM Basics - Submission Template.
Important Watch the video and use the information provided on this page to understand how to fill out the Veeva RIM Basics - Submission Template correctly.
Always download the latest version of the template. Do not reuse templates from previous migrations.Stage Sequences/Submissions in zip format on File Staging.
Stage any Submission Attachments (submission receipts are often loaded as attachments to submissions) on File Staging.
Step 4 (Customer)
Upload the completed Veeva RIM Basics - Submission Template to File Staging. Then use the Migration Communication Form to let Veeva know it has been uploaded.
Step 5 (Veeva)
Veeva will review your completed Veeva RIM Basics - Submission Template and load submission metadata into your Sandbox.
Step 6 (Customer)
Review loaded Submission and confirm Submission data shows in Sandbox as expected. If issues are found, first verify the correct value was in the template. If the issue persists, use the Migration Communication Form to let the Veeva Migration Team know.
Step 7 (Veeva)
Veeva will load Submission archives (steps 3.2 and 3.3 have to be completed).
Step 8 (Veeva)
Veeva will load Submission attachments (steps 3.2 and 3.4 have to be completed).
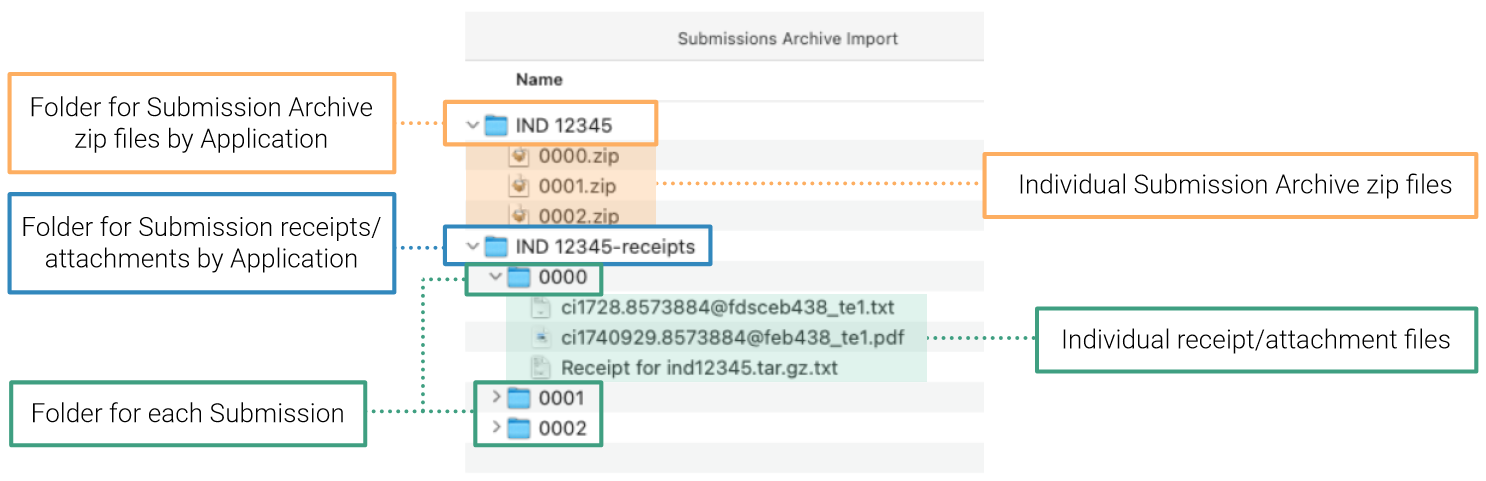
How to Structure the Submission Archives and Receipts/Attachments
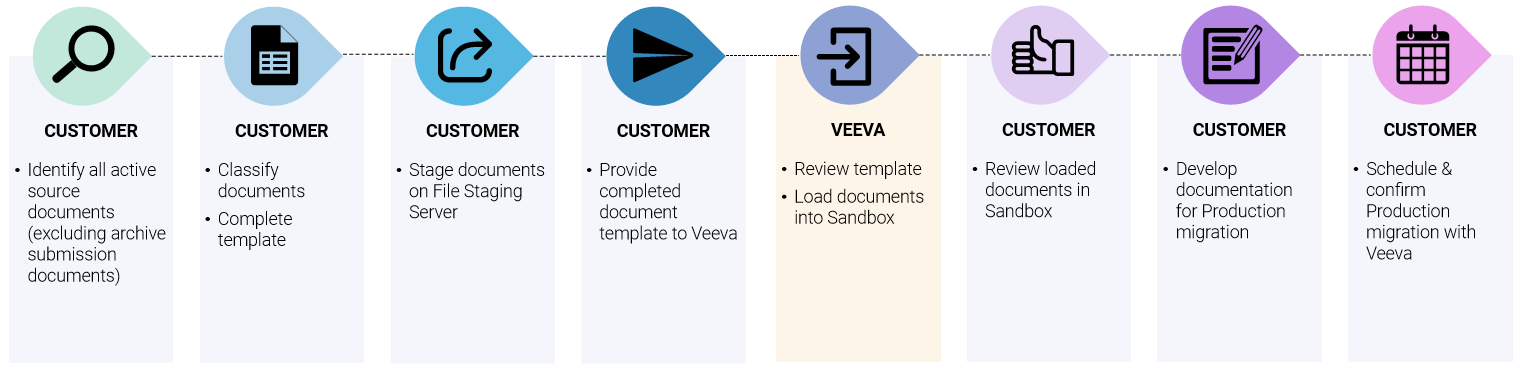
Step 9 (Customer)
Review loaded Submission archives & attachments in Sandbox. Verify all records from the template have been migrated, confirm metadata is populated in the correct fields. If issues are found, first verify the correct value was in the template. If the issue persists, use the Migration Communication Form to let the Veeva Migration Team know.
Step 10 (Customer)
Identify all the active source Documents required for migration (this excludes the archived submission documents).
Step 11 (Customer)
Classify documents and populate the Veeva RIM Basics - Document Template.
Important
Watch the video and use the information provided on this page to understand how to fill out the Veeva RIM Basics - Document Template correctly.
Always download the latest version of the template. Do not reuse templates from previous migrations.
Always download the latest version of the template. Do not reuse templates from previous migrations.
Step 12 (Customer)
Stage documents on File Staging.
Step 13 (Customer)
Upload the completed Veeva RIM Basics - Document Template to File Staging. Then use the Migration Communication Form to let Veeva know it has been uploaded.
Step 14 (Veeva)
Veeva will review your completed Veeva RIM Basics - Document Template and load Documents in your Sandbox.
Step 15 (Customer)
Review loaded documents in Sandbox. Verify all records from the template have been migrated, confirm metadata is populated in the correct fields. For documents, confirm files are accessible. If issues are found, first verify the correct value was in the template. If the issue persists, use the Migration Communication Form to let the Veeva Migration Team know.
Step 16 (Customer)
Develop any required migration documentation, such as a Migration Plan.
Step 17 (Customer)
Use the Migration Communication Form to schedule Production migration with Veeva.
Note
By scheduling your Production migration, you are confirming that the submitted templates are final with no further changes, as Veeva will use these exact templates to load into Production.
Production Migration
Timeline
Production Migration must be requested and completed within seven (7) business days after Sandbox Migration is completed.
Best Practice
Before the production migration, we recommend notifying your users about the upcoming activity in your Production Vault.
Steps
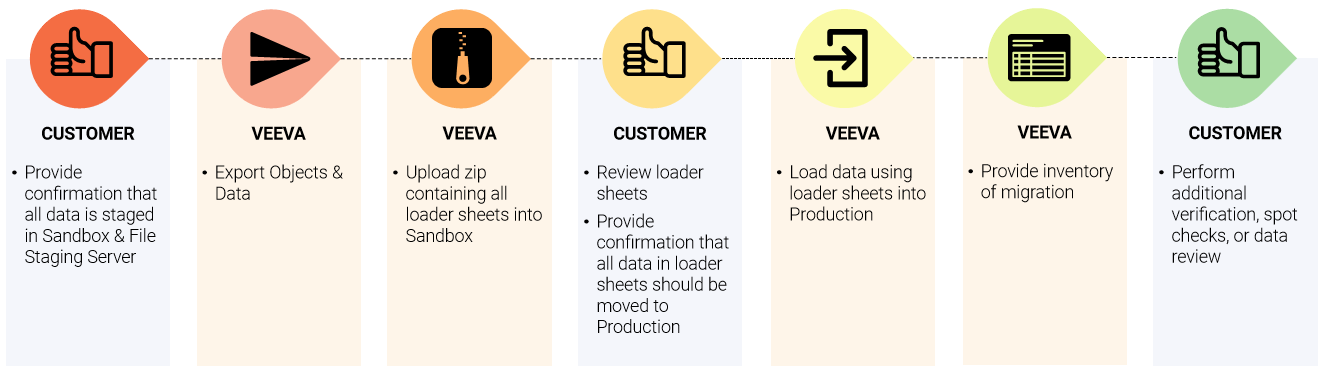
Step 1 (Customer)
Use the Migration Communication Form to confirm that all data is staged in Sandbox and File Staging.
Step 2 (Veeva)
Veeva will export Objects and Data listed in Inventory of Migration.xlsx in loader format.
Step 3 (Veeva)
Veeva will upload the zip containing all the loader sheets to Sandbox Vault and notify customer to review.
Step 4 (Customer)
Review and use the Migration Communication Form to confirm that all data in loader sheets should be migrated to Production.
Note
Veeva recommends making any changes in Sandbox. If any exclusions need to be made please let us know, as Excel tends to make inadvertent changes to dates and special characters in the files, so be careful making any updates.
Step 5 (Veeva)
Veeva will load the data using loader sheets approved by the Customer into Production.
Step 6 (Veeva)
Veeva will provide:
- A populated Inventory of Migration.xlsx, listing the number of records migrated for each entity
- Loader sheets used for Production migration
- Log files
Note
If any issues are encountered, those will be recorded in the Comments section of the Inventory of Migration.xlsx. The zip of Logs, Loader Sheets, and Inventory will be loaded into the Sandbox Vault for customer access.
Step 7 (Customer)
Important
Customers are responsible for data verification and any additional migration documentation, such as a Migration Summary Report.